Earning Codes
On This Page
The system includes a default list of earning codes. You can edit the name and settings associated with each code. You can also create new earning codes and set the parameters to meet your company’s needs for special or custom earnings, including the taxation associated with each earning code.
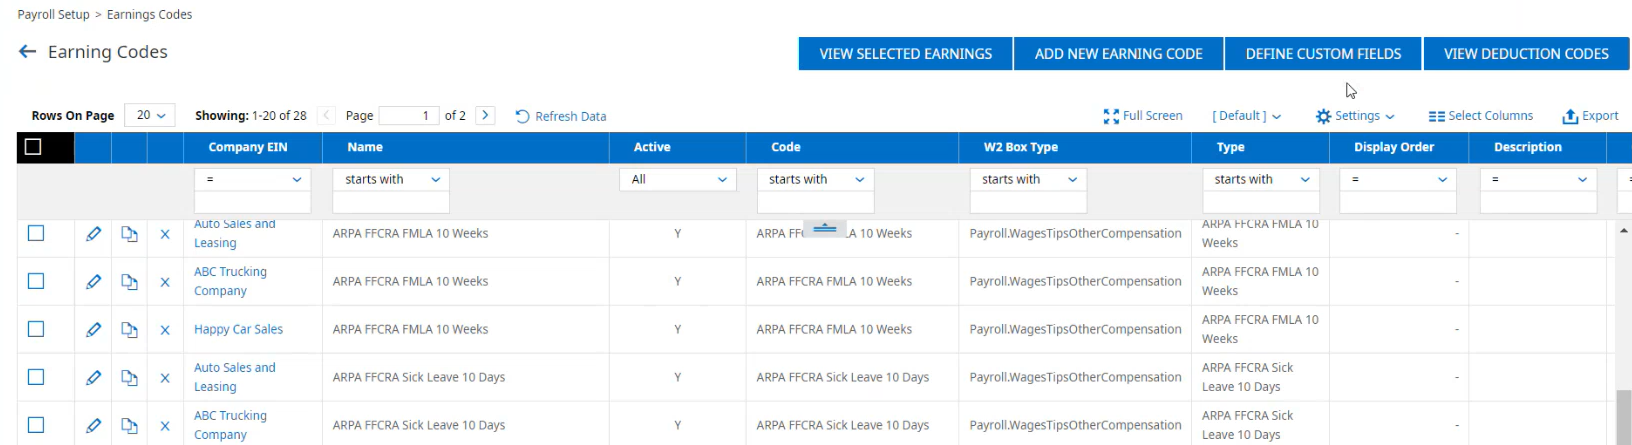
Access earning codes at Administration > HCM Setup >Settings > Payroll Setup > Earnings Codes.
To add a new earning code, follow these steps:
-
Navigate to Administration > HCM Setup >Settings > Payroll Setup > Earning Codes.
-
Select the Add New Earning Code button at the top of the page.
The system displays a Question pop-up window asking which Country, and which Earning Type you want to use for your new Earning Code.
Note: When you add an earning code, you see only the Earning Types (Roll up Earning) that are applicable for the countries that are enabled in your company's configuration. -
In the Question pop-up window, select the drop-down menu to display the Earnings Types available.
You choose the standard Regular type. Then you see another Question box for you to make selections specific to the Regular type. -
After you complete the settings and fields, select the OK button. The following section
-
After you select OK, the Earning page appears.
Settings for Regular Earning Codes
For a Regular earning code in the Question pop-up window, you will see the following sections and fields:
Roll Up Earning: Select the earning code that the new earning will roll up to or be included with for cross-company reporting.
Settings: These are options related to the behavior of the earning code during payroll processing.
Capture Amount / Hours / Units: Select whether you want to capture the Amount / Hours / Units related to this earning.
Rate Multiplier: This field may or may not be editable based on the Roll Up Earning you select.
Include in Weighted Average Premium Calculation: Amount / Hours: Select this option if the Amount, Hours, or both for the earning code should be included in the Weighted Average Overtime (WAOT) premium calculation. After you start using this feature, you can't change the settings.
Include in Lookback Period (WAOT): Select this option for any code that should have the hours and wages included in the Lookback Period calculation.
Use To Store Lookback Result: Select this option for one earning code only. The system automatically adds this code to a pay statement when a Lookback Period is added to an earning code with the Bonus (Supplemental Tax Rate) roll up type.
Include in Actual Hours Worked: Select this if the earnings associated with this earning code should be included as hours worked.
Include in
Include Hours In Totals: The default option is to check this box to allow for reporting of hours associated with earnings. However, for some earnings types, you might choose not to include hours for the earning code in totals, such as for half-time overtime.
Include Hours in Washington FLI: Select this if the earnings associated with this earning code should be included in Washington FLI wages.
Reduce Base Comp.: Options are Yes or No. When marked as Yes, any hours and amounts entered for this earning will also create an offsetting entry against the base compensation record on the pay statement.
Calculate Rate: Use this in combination with Reduce Base Comp. When checked, this option will completely offset the base comp record while calculating the rate of entered hours to equal the amount of the base comp. Use this when you want to cost hours and dollars to a specific cost center, and the hours can be variable but the employee should still be paid a flat salary.
Is Certified: Check this option if this earning code is related to processing of certified payroll. If you check this option, a Certified Payroll Category field appears for you to assign a two-digit code to the earning that will be used in reporting.
Is Prior Pay Period Adjustment: Check this box to identify prior pay period adjustments on the pay statement. After you Select OK, you can't edit the setting. The system allows you to designate an earning code as either Certified, or as a Prior Pay Period Adjustment, but not both.
After you include an earning code of a prior pay period adjustment in a pay statement, you need to select a Pay Period from the Pay Period column. All prior Pay Periods are available in the look-up. After you make changes and save, all prior pay period adjustments are displayed on the pay statement preview in the Earnings section and in the Prior Pay Period Earnings section.
For the Prior Pay Period Earnings section, you can enter a text message. Go to Administration > HCM Setup >Settings > Global Setup > Company Setup on the Payroll tab, find the Printed Pay Statement Options widget and the Include/Exclude And Format section. You will see the checkbox, Prior Pay Period Adjustment. If you enable this checkbox and enter a message, the message will appear on the pay statement preview.
Settings for MinWage Makeup Earning Codes
Create a Minimum Wage Makeup earning code at Administration > HCM Setup >Settings > Payroll Setup > Earning Codes.
Enter the required information, such as Code and Name, and in the Scheduled Default Values section, do the following:
-
Select Minimum Wage Makeup for the Default Amount. This displays the Default Amount Minimum Wage fields.
-
Select the state and city from the Default Amount Minimum Wage drop-down list. Selection of the state/city automatically adds the Minimum Wage rate.
Note: The cities with minimum wage rates will appear in the list using the format State: City (for example, California: San Francisco or if there is no city, State: State). The cities are listed alphabetically by State: City name at the end of the Minimum Wage drop-down list. -
Select the option to Filter By State or Filter By State And City to limit the makeup calculation to this state/state and city combination only. To allow this calculation to apply any city or state, uncheck the option.
When the Minimum Wage Makeup code is used on a pay statement, if the employee does not work in the city or state that is selected on the Minimum Wage Makeup earning code, an error appears on the pay statement. If the option is unchecked, no error appears if the work city/state is something other than what is used in the earning code.
You could set up a Minimum Wage Makeup code for Nevada, and you check the Filter By State box. If the Minimum Wage Makeup earning code is used on a pay statement for an employee with a cost center in California, an error appears on the pay statement. If the Filter By State box is unchecked, no error appears. -
Choose an Earnings List to base the calculation on.
-
Choose a Minimum or Maximum value (optional).
-
Select a Frequency (optional).
Earning Codes Minimum Wage Makeup by City
Minimum Wage Makeup by City functionality is available for calculating the makeup amount based on the city’s minimum wage. Do the following to configure an employee for the Minimum Wage Makeup Earning based on the city’s minimum wage:
-
Create a MinWage Makeup earning code and assign the city to the earning code.
-
Add the MinWage Makeup earning code to the employee’s scheduled earnings.
Calculating the Makeup Amount
The Minimum Wage Makeup amount is calculated when the employee’s base rate on the pay statement is less than the state/city’s Minimum Wage rate.
If the Cost Center address does not match the city jurisdiction, no city makeup amount is calculated. However, if there is a state Minimum Wage Makeup earning code (such as for California) assigned to the employee, the makeup for the state minimum wage is calculated for locations where the city minimum wage rule has not been applied.
Adding Earnings to Employee’s Scheduled Earning
-
Go to My Team > Employee Information.
-
Select the appropriate employee.
-
In the Earnings section on the Payroll page, select New Earning.
-
Select the correct Minimum Wage Makeup earning code, and enter all required data such as the Begin Date, Earnings, and Frequency.
Settings for Piecework
You can use a calculation method based on number of Pieces with the Piecework roll up earning code.
-
To accommodate the Piecework calculation, set up two earning codes.
-
Set up one for the number of Pieces using the Piecework roll up earning code.
-
Set up another to calculate the rate and amount for the Pieces using the Regular roll up earning code with a formula.
-
Specify the code created from the Piecework roll up earning code for the Earnings in the formula.
-
Set up both earnings at the employee level as Scheduled Earnings.
-
In the pay statement or Batch, enter the number of Pieces for the earning code from the Piecework roll up type. When the pay statement is calculated, the amount will appear based on the values in the formula.
As you establish a new Earning Code for Piecework, consider the following important points for the On Pay Statement section options:
-
In the On Pay Statement section for piecework earnings, you can check or uncheck the Show Amount, Show Pieces, Show Rate, and Show YTD checkboxes to show or not show those items.
-
If both hours and pieces are entered for the employee, the Rate, Hours, and Units will display on the pay statement.
-
The Piecework displays the Rate / Units / Current / YTD on the pay statement. The pay statement will only show columns if the settings allow and if there is actual data to display. For example, if there are no hours to display, the column will be skipped.
Settings for WAOT Earning Codes
Employees can earn wages for a period greater than a work week. Bonuses, commissions, and other earnings can be paid after the timeframe in which they are earned. These amounts need to be included in the overtime premium rate for hours that the employee has already received payment for. When bonus, commission, or other earnings cover a period longer than a work week, they must be apportioned back over the work weeks of the period during which they were earned. The employee must then receive additional overtime pay for each work week in which overtime was worked during that period.
Earnings can be determined by a piece rate, salary, commission, or some other basis. But in all such cases, the overtime pay due must be computed on the average hourly rate derived from such earnings. The system calculates this by dividing the total pay for employment (except for the statutory exclusions noted earlier) in any work week by the total number of hours physically worked. When an employee in a single work week works at two or more different types of work for which different straight-time rates have been established, the regular rate for that week is the weighted average of such rates. That is, the earnings from all such rates are added together and this total is then divided by the total number of hours worked at all jobs.
Weighted Average Overtime calculates by posting all hours worked in a work week to an earning code with a rate multiplier of 1.0000. A second earning code using a rate multiplier of .5000 is used for any hours worked over 40 in a work week.
The following two checkboxes are available when you create new WAOT earning codes:
-
Include in Lookback Period (WAOT): Select this option for any code that should have the hours and wages included in the Lookback Period calculation.
-
Use To Store Lookback Result: Select this option for one earning code only. The system automatically adds this code to a pay statement when a Lookback Period is added to an earning code with the Bonus (Supplemental Tax Rate) roll up type.
You can select these options on currently used earning codes if you already use the WAOT functionality and want to begin to use the Lookback functionality.
Two alerts can appear when you use the Lookback feature:
-
An Alert displays if a Bonus (Supplemental Tax Rate) code with Include in Lookback Period (WAOT) is used in a pay statement and Lookback dates are not input.
-
An Alert displays if a Bonus (Supplemental Tax Rate) code with Include in Lookback Period (WAOT) is used and Lookback dates are input. The alert lists which pay periods are being included in the calculation of the additional overtime premium added to the employee pay statement.
Create an earning code that uses the Bonus (Supplemental Tax Rate) roll up earning type. Check the Include in Lookback (WAOT) box when you create this code. If you have existing earning codes that use the Bonus (Supplemental Tax Rate) roll up type, you can add the Include in Lookback (WAOT) functionality to the existing earning codes.
Create an earning code that uses the Regular roll up earning type. Select the Store Lookback Result box when you create this code. The system automatically adds the code to a pay statement when you add a Bonus (Supplemental Tax Rate) roll up type and enter lookback dates in the Date From and Date To fields on the pay statement edit page.
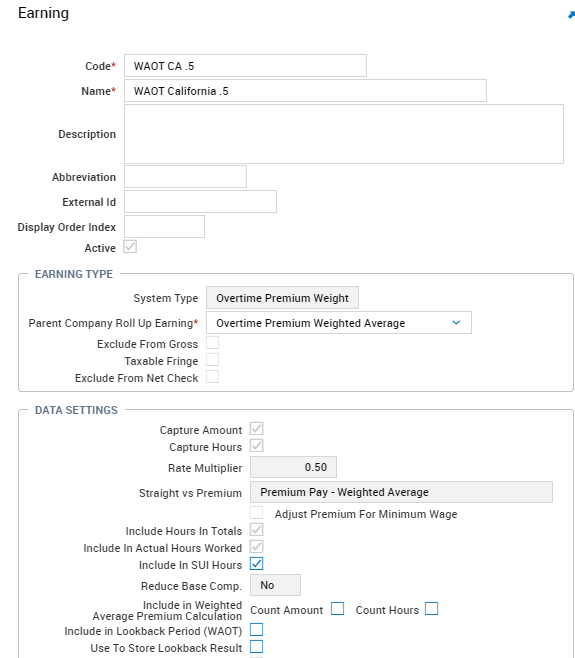
Create an earning code that uses the Average Overtime (0.5) roll up earning type. This code records the overtime hours for the WAOT calculation.
Add the Date From and Date To columns on the Edit Pay Statement page when you add a Bonus (Supplemental Tax Rate) roll up type earning code to the pay statement.
The Lookback timeframe you enter is pay period date driven and not check date driven. You input the dates based on the pay period begin date and pay period end date for the lookback period needed. The system looks for the closest pay periods to the dates that are added to the system.
You can manually input the Bonus earnings and Lookback date range in the edit pay statement, or you can import the earnings amount and the lookback period using the External Payroll Data Upload import or Employee Payroll History import located at Administration > HCM Setup >Settings > Imports > Overview.
Jill worked 160 regular hours in the lookback timeframe and 17 OT hours. Here is the breakdown:
4/28 – 5/4: 40 reg, 3 OT
5/5 – 5/11: 40 reg, 5 OT
5/12 – 5/18: 40 reg, 4 OT
5/19 – 5/25: 40 reg, 5 OT
Bonus OT Premium rate = $84.00/4 = $21.00 per week
Settings for California Flat Amount Bonuses
The system can calculate Weighted Average Overtime (WAOT) properly for the regulation passed by California regarding flat amount bonuses. Any bonus that is not based on the number of hours worked and does not tend to increase in size because of the number of hours worked by an employee is considered a flat sum or flat rate bonus.
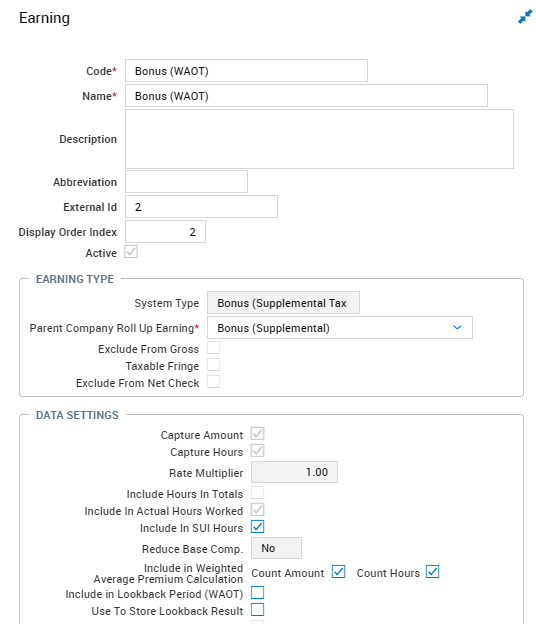
Select the Bonus (Supplemental) earning code roll up type (Flat Sum Bonus per CA regulations) when you add the Bonus earning code. Enable the appropriate checkboxes to Include in Weighted Average Premium Calculation and Include in Lookback Period (WAOT) for the Weighted Average Premium Calculation.
You need to create a new earning code that uses the Bonus (Supplemental Tax Rate) roll up code. Enable the Include in Weighted Average Premium Calculation and Include in Lookback Period (WAOT) options. If you have existing earning codes, you can add the Include in Lookback (WAOT) functionality to the existing earning codes.
You also need to create a new earning code for the WAOT using a .5000 rate multiplier (if you don't have an existing code already in place).
After you create these codes, you can create pay statements that include the Bonus earnings, and per the California regulation, the wages will calculate properly.
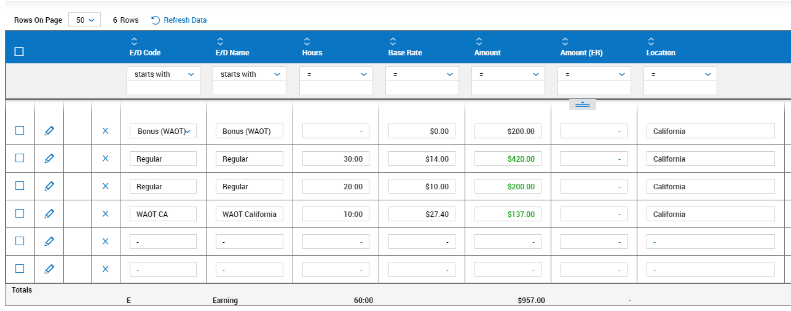
The system performs the WAOT premium rate calculation for the California Bonus rule using the following formula:
The amount of flat bonus in the current pay statement (bonus earnings should have the Include in Weighted Average Premium Calculation checkbox enabled), divided by the number of regular hours in the pay statement (regular earnings should have the Include in Weighted Average Premium Calculation checkbox enabled), then multiplied by the 1.5000 rate multiplier.
Earning
In the Earning widget on the Earning page, configure the settings for the new earning. Each earning has different system requirements based on its type.
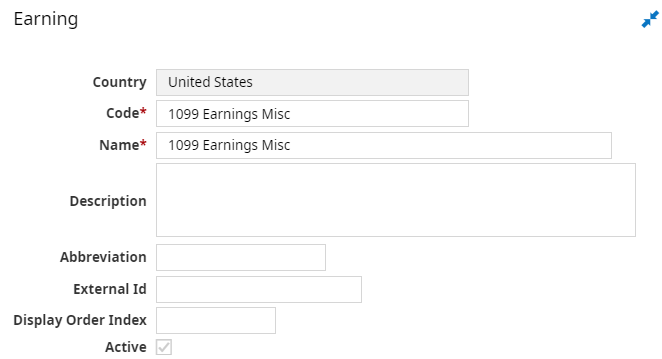
Country: The country associated with the earning code setup will display in this field.
Code: Enter a unique code that identifies the earning.
Name: Enter a name that identifies the earning.
Description: Enter a description that further defines the earning code.
Abbreviation: Enter the abbreviation for the earning. This will be displayed on the pay statement.
External Id: Enter a unique link to an external system. You can use this to map historical data when importing data from another system.
Display Order Index: Enter a numeric value for the earning to establish the display order on pay statements and appear in a sortable column in reports.
Active: This option is checked by default and cannot be changed. You can inactivate earning codes immediately after saving by selecting the Inactivate Earning button. You can also inactivate them at a later date by navigating to Administration > HCM Setup >Settings > Payroll Setup > Earning Codes and selecting the View Earning icon on the earning code row. The Earning Code Details page appears, and an Inactivate Earning button appears at the top of the page. After you select the Inactivate Earning button, a pop-up window with the following three options appears:
Delete Open Manual Records: Use this to have the system delete any payroll records for the earning code in open payrolls. Records containing this earning code in finalized payrolls will not be affected.
End Scheduled Earnings As Of Date: Check this box and select an end date to end-date scheduled earning codes.
Display in Reports: Use this option to determine whether the earning code will appear in reports that include earning codes (for example, Earning/Deduction/Tax Listing reports).
Check the appropriate options and select OK to inactivate the earning code.
Earning Type
This section contains information related to the Earning Type.
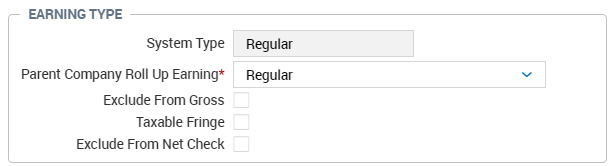
System Type: This system-controlled field is populated based on the Earning Type you select.
Parent Company Roll Up Earning: This is the default Earning Type to roll up the earning code into, which is selected in the Question pop-up window. Use this option for global reporting of like-earnings across multiple companies regardless of the naming convention.
Exclude From Gross: This system-controlled section is populated based on the Earning Type you select.
Taxable Fringe: This system-controlled box is populated based on the Earning Type you select.
Exclude From Net Check: This system-controlled box is populated based on the Earning Type you select.
Data Settings
This section contains information related to the type of data captured by the earning code.
Overtime Earning: Excludes overtime from the calculation of Kentucky OLF taxes.
Capture Amount: This information is carried forward from the Question pop-up window when you first set up an earning code. You can't disable this checkbox.
Capture Hours: This information is carried forward from the Question pop-up window when you first set up an earning code. You can't edit it here.
Rate Multiplier: In most cases, this information is carried forward from the Question pop-up window when you first set up an earning code. You can't edit it here. However, depending on the roll up type, some rate multipliers can be overridden; this allows for different rates to be used in unusual circumstances (for example, to provide a higher rate for holiday earnings).
Include Hours in Totals: This information is carried forward from the Question pop-up window when you first set up an earning code. You can't edit it here.
Include in Actual Hours Worked: This information is carried forward from the Question pop-up window when you first set up an earning code. You can't edit it here.
Include in
Calculate Rate: This information is carried forward from the Question pop-up window when you first set up an earning. You can't edit it here.
Reduce Base Comp: This information is carried forward from the Question pop-up window when you first set up an earning code. You can't edit it here.
Include in Weighted Average Premium Calculation: Count Amount / Count Hours: This information is carried forward from the Question pop-up window when you first set up an earning code. You can't edit it here.
Include in Lookback Period (WAOT): Select this option for any code that should have the hours and wages included in the Lookback Period calculation.
Use To Store Lookback Result: Select this option for one earning code only. The system automatically adds this code to a pay statement when a Lookback Period is added to an earning code with the Bonus (Supplemental Tax Rate) roll up type.
Is Certified: This information is carried forward from the Question pop-up window when you first set up an earning code. You can't edit it here.
Is Prior Pay Period Adjustment: Check this to use this earning code for prior period adjustments.
Is Florida Government Or Non-Profit: Check this to use this earning code as part of a non-profit organization or part of the government of Florida.
Is New York Other: Check this to use this earning code for New York.
Is Washington Non-statutory Stock Option: Check this to use this earning code as a Washington stock option that is not a statutory requirement.
System-Generated Retro: Check this to use this earning code in the automated retro pay calculations for the System-Generated Retro earning.
Include Hours in Washington FLI: Check this to use this earning code in Washington FLI.
Currency: If the company has Multi-Currency enabled, this Currency field will display, and it is set to Universal Currency by default. The Currency field can then be updated to the appropriate currency.
On Pay Statement
In this section, configure which earning information will appear on the employee pay statement.
Show Amount: Check this box if you want the employee earnings amount to show on the employee pay statement.
Show YTD: Check this box if you want the year-to-date (YTD) employee earnings amount to show on the employee pay statement.
Show Hours: Check this box if you want the employee hours to show on the employee pay statement.
Show YTD: Check this box if you want the employee year-to-date (YTD) hours to show on the employee pay statement.
Show Rate: Check this box if the employee rate of pay should show on the employee pay statement.
Foot Note: Enter any text that should be displayed as a footnote on the pay statement to assist the user in understanding the earning code.
Options
This section contains additional options related to the earning code.
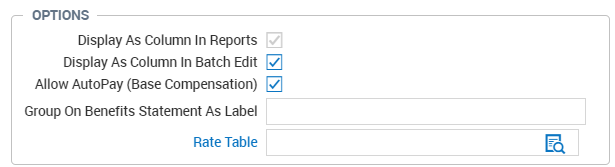
Display as Column in Reports: This is system-controlled and cannot be edited. This option allows the earning to be included in payroll reports as needed.
Display As Column in Batch Edit: Check this box to allow this Earnings Type to be included as a column in the payroll batch when processing payroll.
Allow AutoPay (Base Compensation): Check this box to allow this earning to be used in creating AutoPay earnings for employees.
Group on Benefits Statement As Label: Enter the Benefits Statement label that this earning code should be grouped under when printing the Benefits Statement.
Rate Table: If this earning code is related to a Rate Table, select the look-up icon to choose the appropriate Rate Table to apply to this earning code.
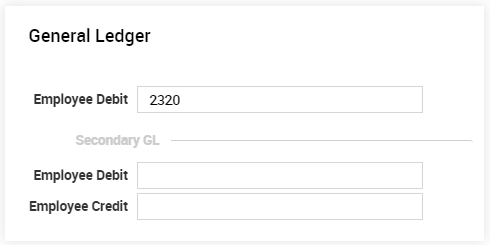
General Ledger
In this widget, enter the GL segments for processing amounts in the General Ledger for the earning amount (expense). In addition, if the Secondary GL feature is enabled, you see more boxes where you can enter an additional debit and credit segment associated with the earning. This option will not display until you select Save.
Scheduled Default Values
In this widget, select any values that are defaults for the earning code.
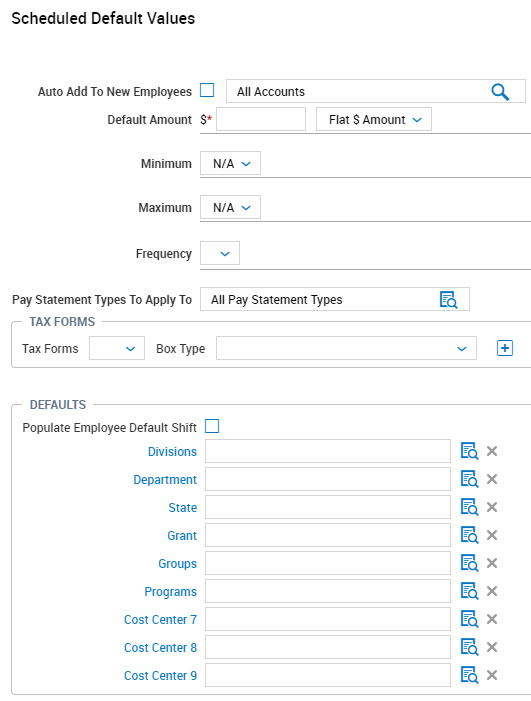
Auto Add To New Employees: Check this box if the system will automatically add this Earning Type to all new accounts. Select the look-up icon if you want to add a filtered list of accounts for which to auto add this earning code.
Default Amount: Enter the default amount with the optional ability to override at the employee level.
Minimum/Maximum: You can set a minimum or maximum amount.
Frequency: Choose the appropriate frequency option from the drop-down list for this earning code with the ability to override at the employee level.
Pay Statement Types To Apply To: Select the look-up icon to choose a Pay Statement Type. If the option you want is not listed, you can add a new list directly from that pop-up window.
Tax Forms: Configure the settings in this section to designate which tax forms this earning should be reported on and in which boxes it should be reported. Company Earning Codes that need to be reported on a tax form require you to first select the appropriate tax forms
Defaults: This section contains defaults that you can apply to this Earning Type.
Populate Employee Default Shift: Select this if the employee default shift should be populated for this Earning Type.
Cost Center Defaults: You can choose a default Cost Center or Job to associate with this earning code when used as a scheduled earning. Select the look-up icon to choose a Cost Center or Job.
Custom Fields
In this widget you can choose from existing Custom Fields or define new ones by selecting the Define Fields link.
Part of the Following Lists
In this widget you can check boxes for an existing list or create a new list by selecting the New Earning List button.
Tax Settings
This widget contains the Federal
Options are available to Add or Delete a tax setting, where applicable.
After you add your information, select the Save button at the top of the page.
On the Earning Codes page under Administration > HCM Setup >Settings > Payroll Setup > Earning Codes, choose one or more codes and select the View Selected Earnings button. On the next page, select the View Scheduled Earnings button, and the Earnings page appears so that you can view the selected scheduled earnings. In addition, you can also view employee level earnings, add employee level earnings, mass edit earnings, or delete scheduled earnings.